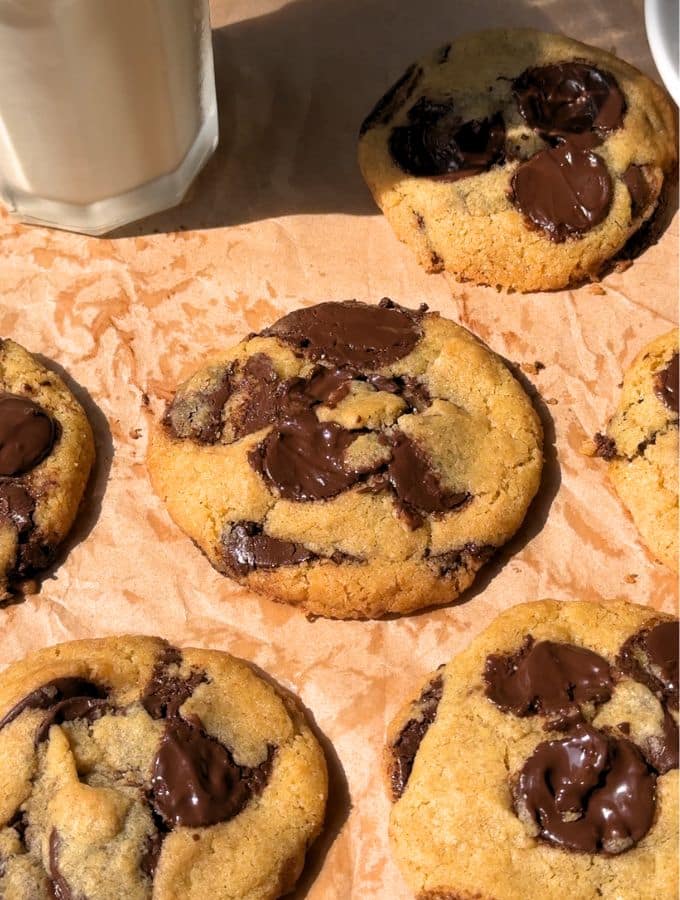
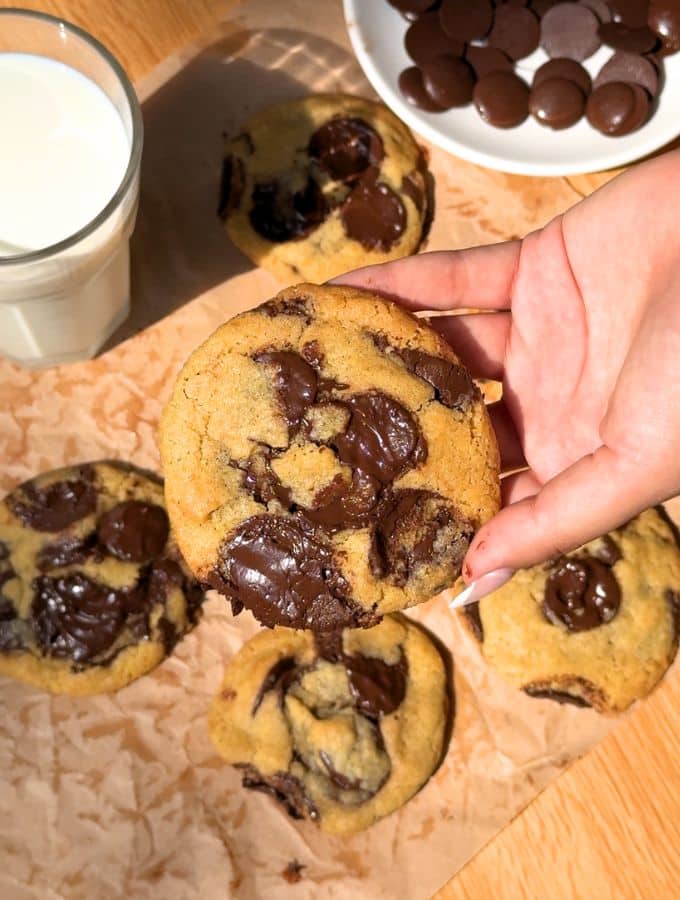
These small batch chocolate chip cookies are incredibly soft, chewy, and easy to whip up in just one bowl, no electric hand mixer required.
This recipe is perfect when you want a quick, homemade cookie without making a big mess in the kitchen. It makes exactly 8 cookies in a single bowl, so cleanup is a breeze.
You do not need a heavy mixer or any fancy baking tools, and you can have a warm snack ready to eat in less than an hour.
The secret to these cookies is using melted butter and just one egg yolk, which makes the centers extra soft and fudgy while the edges stay nice and crunchy.
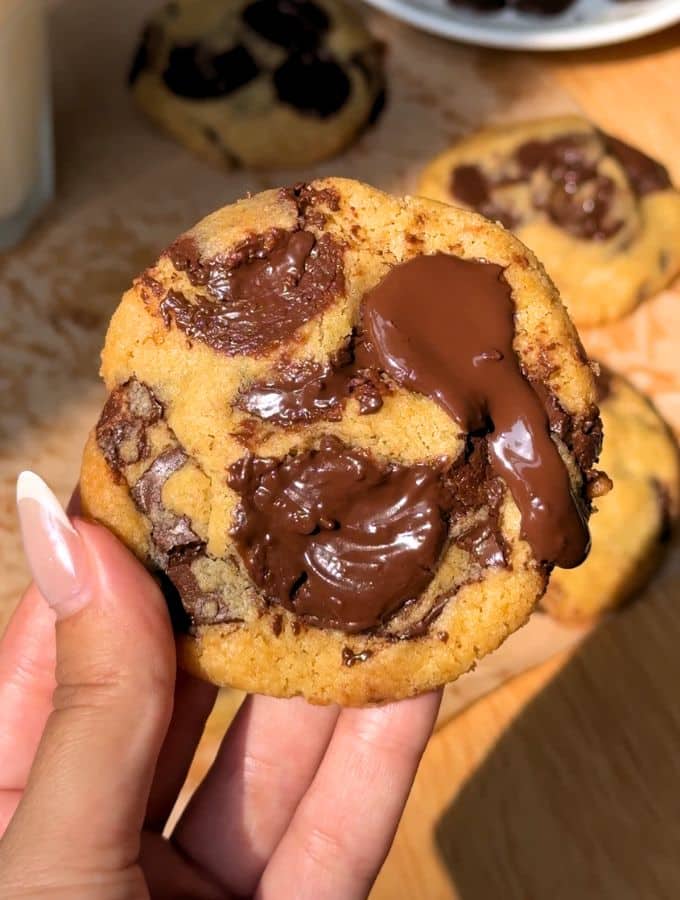
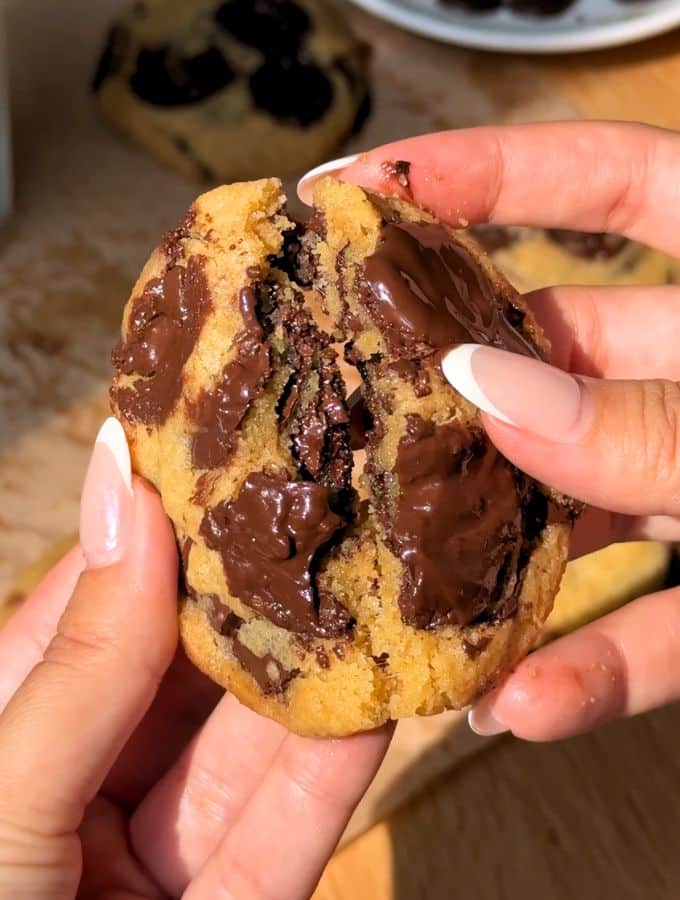
Packed with melty chocolate in every single bite, these taste just like they came from a boutique bakery.
For more cookie recipes, check out my double chocolate cookies, brown butter chocolate chunk cookies, crème brûlée cookies, and lemon crinkle cookies.
Jump to:
Why this recipe works
- One-Bowl & No Mixer: Using melted butter means you only need a hand whisk and a single bowl for zero cleanup.
- The Egg Yolk Secret: Using only the yolk (no white) ensures a dense, extra-chewy center instead of a cakey, puffy texture.
- No-Chill Optional: Thanks to a balanced flour-to-butter ratio, you can bake these immediately if you're in a rush, or chill them for 30 minutes for an even thicker, fudgier bite.
- Perfectly Portioned: Designed specifically to yield exactly 8 cookies to satisfy a sweet craving without dealing with leftover mountains of dough.
Ingredients
Full measurements are in the recipe card below.
- Unsalted Butter: Melted and slightly cooled. Melted butter creates a fudgy, dense texture compared to creamed butter.
- Light Brown Sugar: Provides a soft, moist texture and a deep, classic caramel flavor note.
- Granulated White Sugar: Essential for creating crisp edges and helping the cookies spread just the right amount.
- Egg Yolk: The key to small-batch baking. One yolk provides the exact richness and fat needed for a dense center without excess liquid.
- Pure Vanilla Extract: Deepens the natural notes of the sugars and chocolate.
- All-Purpose Flour: Provides the core protein structure for the cookie dough.
- Baking Soda: Acts as the leavening agent for a light lift and a beautiful golden-brown color.
- Fine Sea Salt: Balances the heavy sweetness and intensifies the chocolate.
- Chocolate Chips or Chunks: Use high-quality semi-sweet chocolate. Chopping up a chocolate bar creates gorgeous, pool-like melty pockets.
Instructions
1. Prep: Preheat your oven to 350°F (180°C) and line a baking sheet with parchment paper.
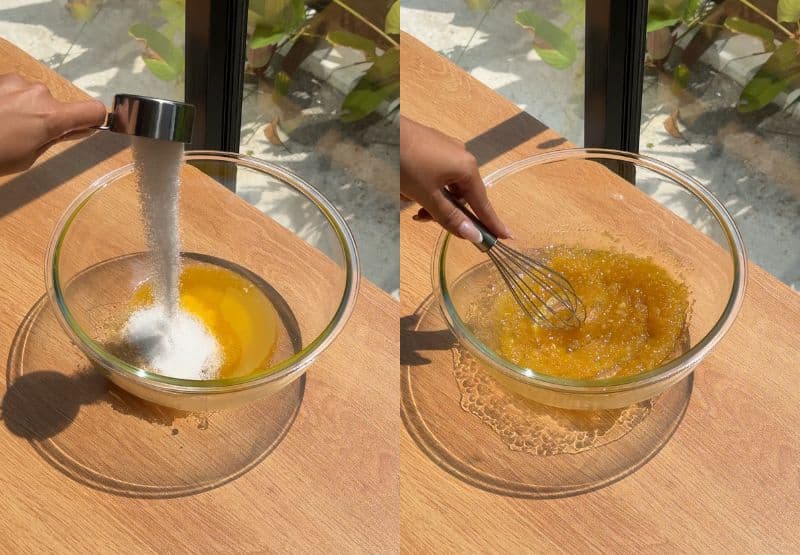
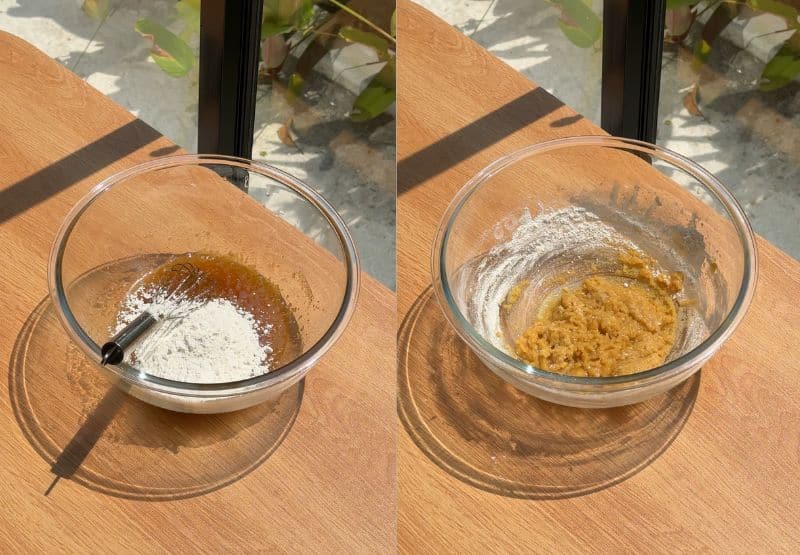
2. Melt & Cool: Melt your unsalted butter in the microwave or on the stovetop. Pour it into a medium mixing bowl and let it sit for a few minutes to cool down to room temperature so it doesn't cook the egg.
3. Whisk Sugars: Add the brown sugar, white sugar, fine sea salt, and vanilla extract to the cooled butter. Whisk them together thoroughly until smooth.
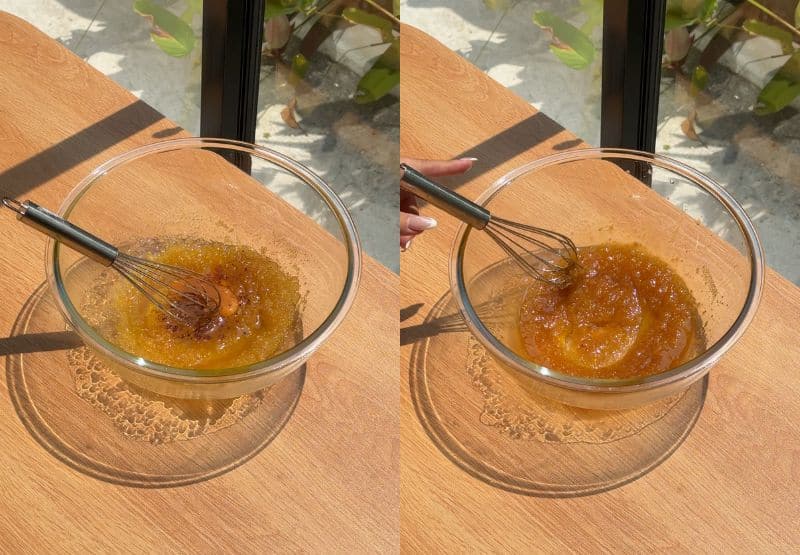
4. Emulsify: Add the room-temperature egg yolk and whisk vigorously until the mixture looks glossy, thick, and well-combined.
5. Fold Dry: Sift or pour the all-purpose flour and baking soda into the bowl. Use a rubber spatula to gently fold everything together. Stop mixing the exact moment you no longer see streaks of white flour.
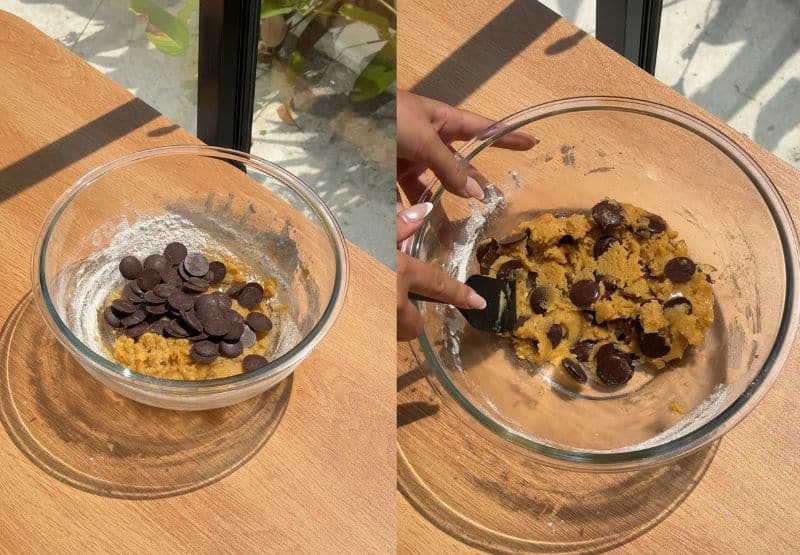
6. Add Chocolate: Fold in your chopped chocolate chunks or chips until they are evenly distributed through the dough.
7. Scoop & Bake: Scoop the dough into 8 equal balls using a cookie scoop and place them onto your prepared baking sheet. Bake for 9–11 minutes until the edges are golden brown, but the centers still look slightly soft.
8. Cool: Let the cookies sit on the hot baking sheet for 5 minutes to finish setting. Sprinkle with a little flaky sea salt if desired, then transfer to a wire rack or serve warm!
Expert Tips
- Use a Kitchen Scale: Weighing your flour is critical for this small batch. Cups easily pack in too much flour, which will accidentally turn these cookies dry and cakey instead of dense and chewy. For the perfect texture, measure in grams.
- Use a Room-Temperature Yolk: Take your egg out of the fridge 15 minutes before baking. A cold yolk will seize up your melted butter and ruin the smooth dough emulsion.
- Chop Your Own Chocolate: Instead of bags of chips, chop up a premium chocolate bar. This creates thin shards and uneven chunks that melt into gorgeous "chocolate pools."
- Use a Cookie Scoop: This guarantees all 8 cookies are exactly the same size, ensuring they finish baking at the exact same moment.
- Watch the Oven Clock: Small batches turn from perfect to overbaked in under 60 seconds. Pull them out when the edges look golden brown but the center is still soft to the touch.
- The Pan Bang Trick: Halfway through baking, gently lift and drop the baking sheet against your oven rack. This flattens the center and creates beautiful, professional-looking bakery ripples.
- The Cookie Scoot: If your cookies bake into wonky shapes, place a large circular glass or cookie cutter over them while hot and gently swirl it in a circular motion to shape them into perfect circles.
Troubleshooting
Cookies are Flat and Greasy: Your melted butter was likely still too hot when you mixed in the sugar and egg, or you under-measured the flour. Ensure the butter is cool, and use a kitchen scale for your dry ingredients.
Cookies Didn't Spread: Too much flour is the main culprit here. If you use a measuring cup, it packs down and adds too much dry volume. Use a scale or the "spoon and level" method next time.
Cookies are Cakey Instead of Chewy: You likely used a whole egg instead of just the yolk, or you over-mixed the dough once the flour went in. The egg white contains water that creates steam and "puff"—stick to just the yolk.
FAQS
No. In a small batch this size, a whole egg adds way too much liquid, which will make your cookies cakey and puffy. The yolk is the secret to keeping them dense and fudgy.
The brown sugar provides essential moisture and chew due to the molasses, while the white sugar ensures crisp, golden edges. Using only one will significantly change the final texture.
Yes. You can use salted butter if that is all you have on hand. Just omit the fine sea salt from the dry ingredients entirely so your cookies don't turn out overly salty.
No. The egg yolk is non-negotiable in this small batch. It provides the essential fat and binding power needed for a dense, chewy texture. Leaving it out or using a substitute will cause the cookies to spread completely flat, crumble, or dry out.
Storing, Freezing, & Make-Ahead
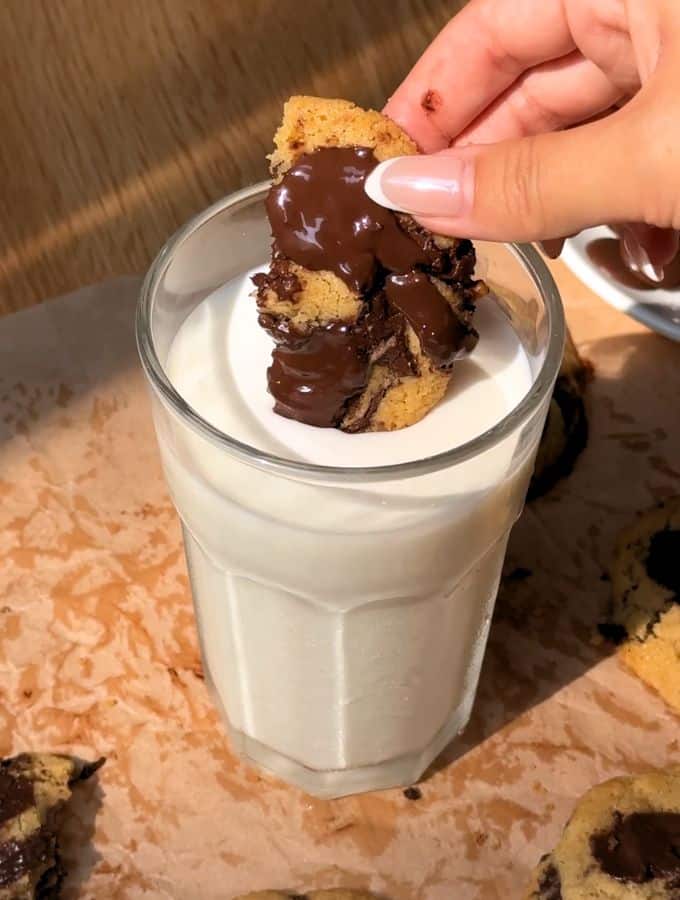
Storing: Keep your cookies in an airtight container at room temperature for up to 5 days. Pro Tip: Microwave a cookie for 10 seconds before eating to make the chocolate pools perfectly melty again.
Freezing Dough: Scoop the dough into 8 balls and flash-freeze them on a tray for 1 hour. Once solid, transfer to a freezer bag for up to 3 months. Bake straight from the freezer, adding 1–2 minutes to the total baking time.
Freezing Baked Cookies: Allow the cookies to cool completely, then store them in a freezer-safe container with parchment paper between layers for up to 2 months. Thaw at room temperature for an hour.
Make-Ahead: You can make the dough up to 3 days in advance; scoop it into balls and store them covered in the fridge, then bake them straight from the fridge.
Alternatively, freeze the raw dough balls for up to 3 months so you can bake a single fresh cookie whenever a craving hits.
Substitutions
Gluten-Free: Use a high-quality 1-for-1 gluten-free baking flour blend containing xanthan gum.
Dairy-Free: Swap the butter for vegan butter sticks formulated for baking. Avoid tub margarine or liquid oils, as they will cause the cookies to puddle.
Sugar Alternative: If you are out of white granulated sugar, caster sugar is great for these cookies as well.
Variations
White Chocolate: Swap the semi-sweet chocolate chunks for white chocolate chips.
Double Chocolate: Replace 2 tablespoons of the all-purpose flour with premium Dutch-process cocoa powder to make a chocolate cookie base.
M&M Cookies: Replace half of the chocolate chunks with mini M&Ms for a pop of color and extra crunch.
Equipment
- Mixing Bowl
- Whisk
- Rubber Spatula
- Measuring Cups and Spoons
- Baking Sheet
- Parchment Paper
- Cookie Scoop
More Cookie Recipes to Try
- Almond Croissant Cookies: All the flavors of a French bakery in cookie form, filled with homemade frangipane and topped with sliced almonds.
- Pistachio Chocolate Chip Cookies: The ultimate viral cookie featuring a thick pistachio butter center and gooey chocolate edges.
- Lemon Meringue Cookies: A soft, lemon-infused cookie base filled with tangy lemon curd and topped with a cloud of toasted Swiss meringue.
Connect With Us
Review: Leave a rating and comment below if you enjoyed this recipe. Socials: Follow on Facebook, Instagram, and Pinterest. Save: Pin this recipe to Pinterest for later.
📖 Recipe

Chewy Small Batch Chocolate Chip Cookies
Ingredients
- ¼ cup Butter unsalted, melted
- ¼ cup Brown sugar light brown sugar
- 2 ½ tablespoon Granulated sugar
- ½ teaspoon Vanilla extract
- 1 Egg yolk
- ¼ teaspoon Kosher salt
- ⅓ teaspoon Baking soda
- ⅔ cup Flour
- ½ cup Chocolate chunks or chocolate chips
Instructions
- Preheat your oven to 350°F (180°C) and line a baking sheet with parchment paper.
- Melt your unsalted butter in the microwave or on the stovetop. Pour it into a medium mixing bowl and let it sit for a few minutes to cool down to room temperature so it doesn't cook the egg.
- Add the brown sugar, white sugar, fine sea salt, and vanilla extract to the cooled butter. Whisk them together thoroughly until smooth.
- Add the room-temperature egg yolk and whisk vigorously until the mixture looks glossy, thick, and well-combined.
- Sift or pour the all-purpose flour and baking soda into the bowl. Use a rubber spatula to gently fold everything together. Stop mixing the exact moment you no longer see streaks of white flour.
- Fold in your chopped chocolate chunks or chips until they are evenly distributed through the dough.
- Scoop the dough into 8 equal balls using a cookie scoop and place them onto your prepared baking sheet. Bake for 9–11 minutes until the edges are golden brown, but the centers still look slightly soft.
- Let the cookies sit on the hot baking sheet for 5 minutes to finish setting. Sprinkle with a little flaky sea salt if desired, then transfer to a wire rack or serve warm!
Notes
- Use a Kitchen Scale: Weighing your flour is critical for this small batch. Cups easily pack in too much flour, which will accidentally turn these cookies dry and cakey instead of dense and chewy. For the perfect texture, measure in grams.
- Use a Room-Temperature Yolk: Take your egg out of the fridge 15 minutes before baking. A cold yolk will seize up your melted butter and ruin the smooth dough emulsion.
- Chop Your Own Chocolate: Instead of bags of chips, chop up a premium chocolate bar. This creates thin shards and uneven chunks that melt into gorgeous "chocolate pools."
- Use a Cookie Scoop: This guarantees all 8 cookies are exactly the same size, ensuring they finish baking at the exact same moment.
- Watch the Oven Clock: Small batches turn from perfect to overbaked in under 60 seconds. Pull them out when the edges look golden brown but the center is still soft to the touch.
- The Pan Bang Trick: Halfway through baking, gently lift and drop the baking sheet against your oven rack. This flattens the center and creates beautiful, professional-looking bakery ripples.
- The Cookie Scoot: If your cookies bake into wonky shapes, place a large circular glass or cookie cutter over them while hot and gently swirl it in a circular motion to shape them into perfect circles.

Dale says
Hands down best chocolate chip cookies. I wonder if the recipes for full batch is the same?
RichandDelish says
I’m so glad you like it! Yes, just double the recipe, it’s the same.
lia says
this was so good, i loved this recipe, will be trying again!
Rup says
Hi what is the conversion of 60 grams of butter in cups? Is salted butter ok to use?
RichandDelish says
60 grams of butter is 1/4 cup. Salted butter is okay, simply decrease the salt in the recipe.
Forrest says
Doesn’t look like you included what temperature to bake these @?
RichandDelish says
Hi, you will need to bake these cookies in a 180c (350f) preheated oven for 9-11 minutes (depends on the size). Sorry about the confusion! Fixed it in the post.