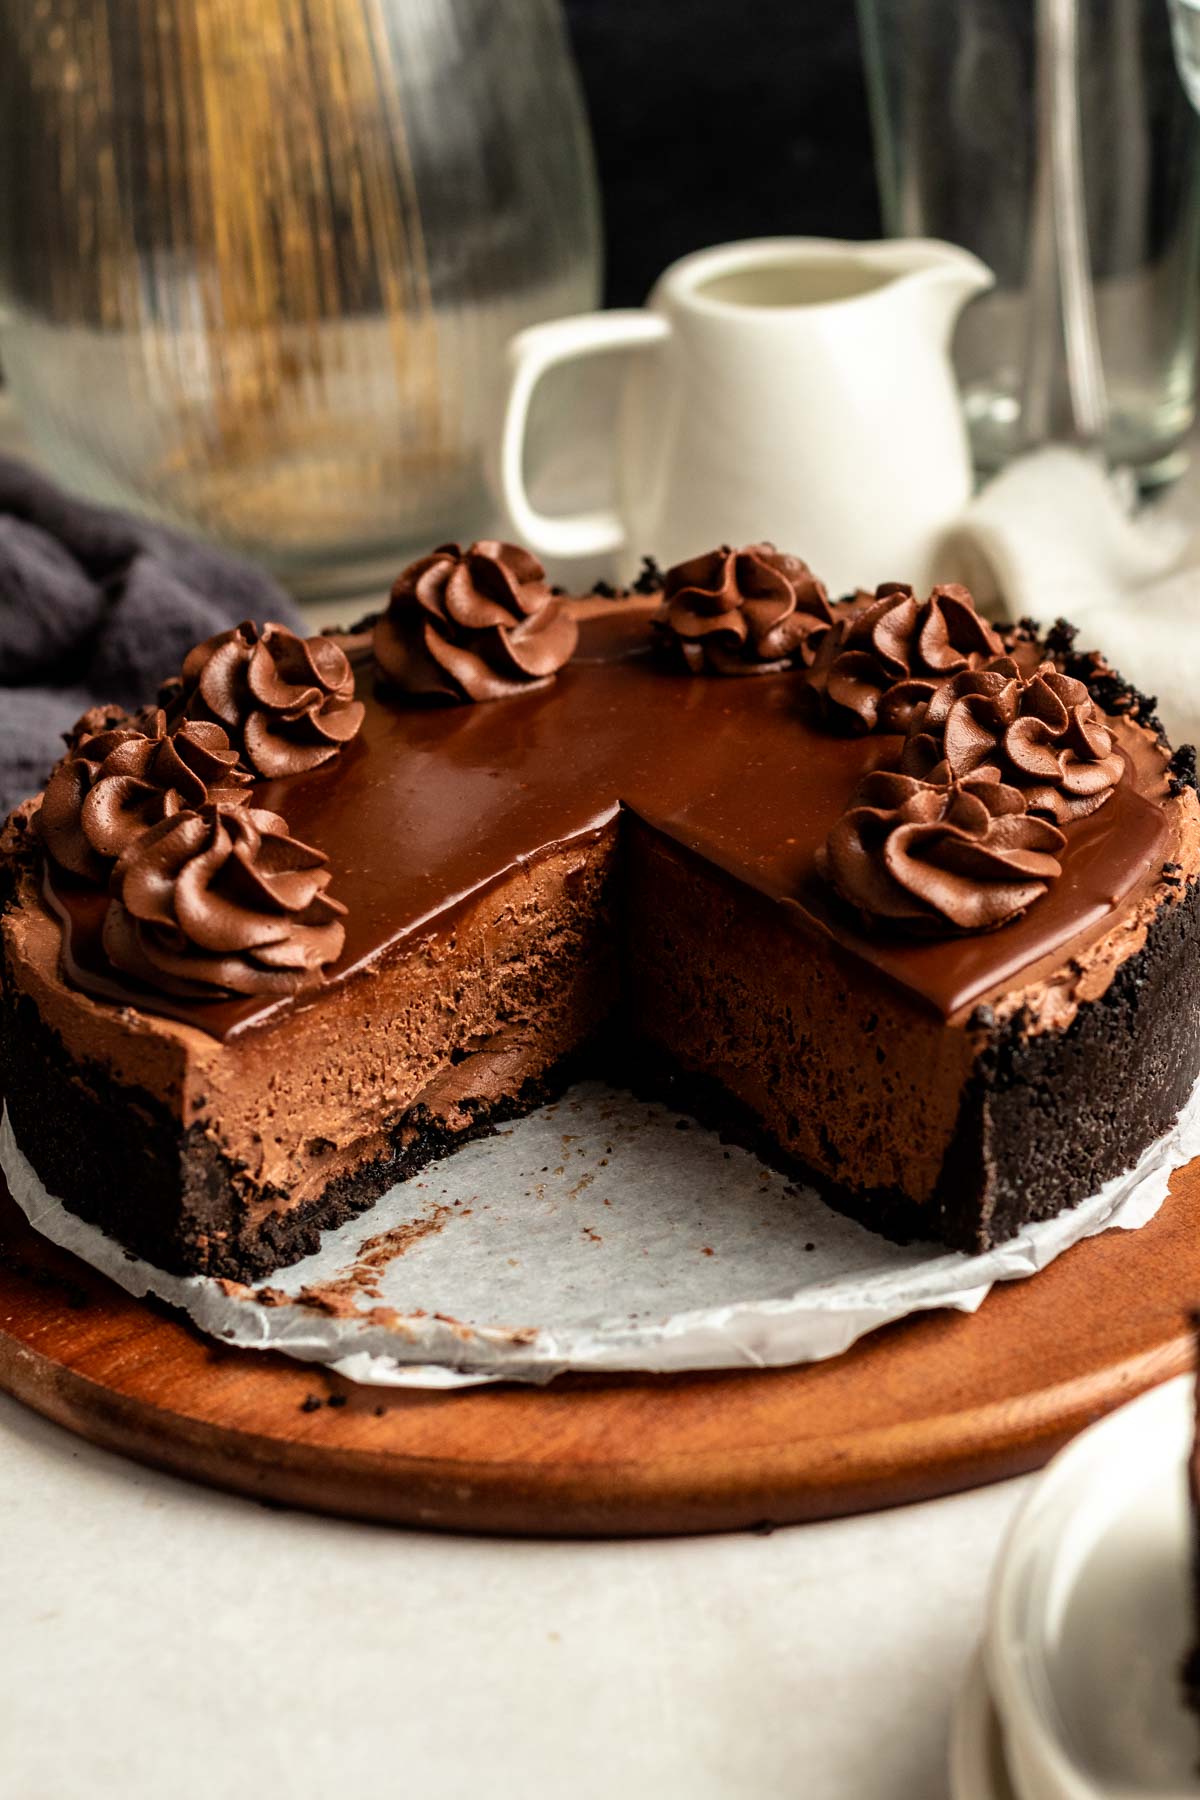
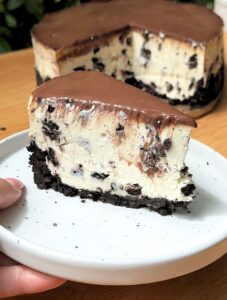
This no-bake chocolate cheesecake features a crisp Oreo crust and a stable filling made with cocoa powder and chocolate ganache for a rich, deep chocolate flavor.
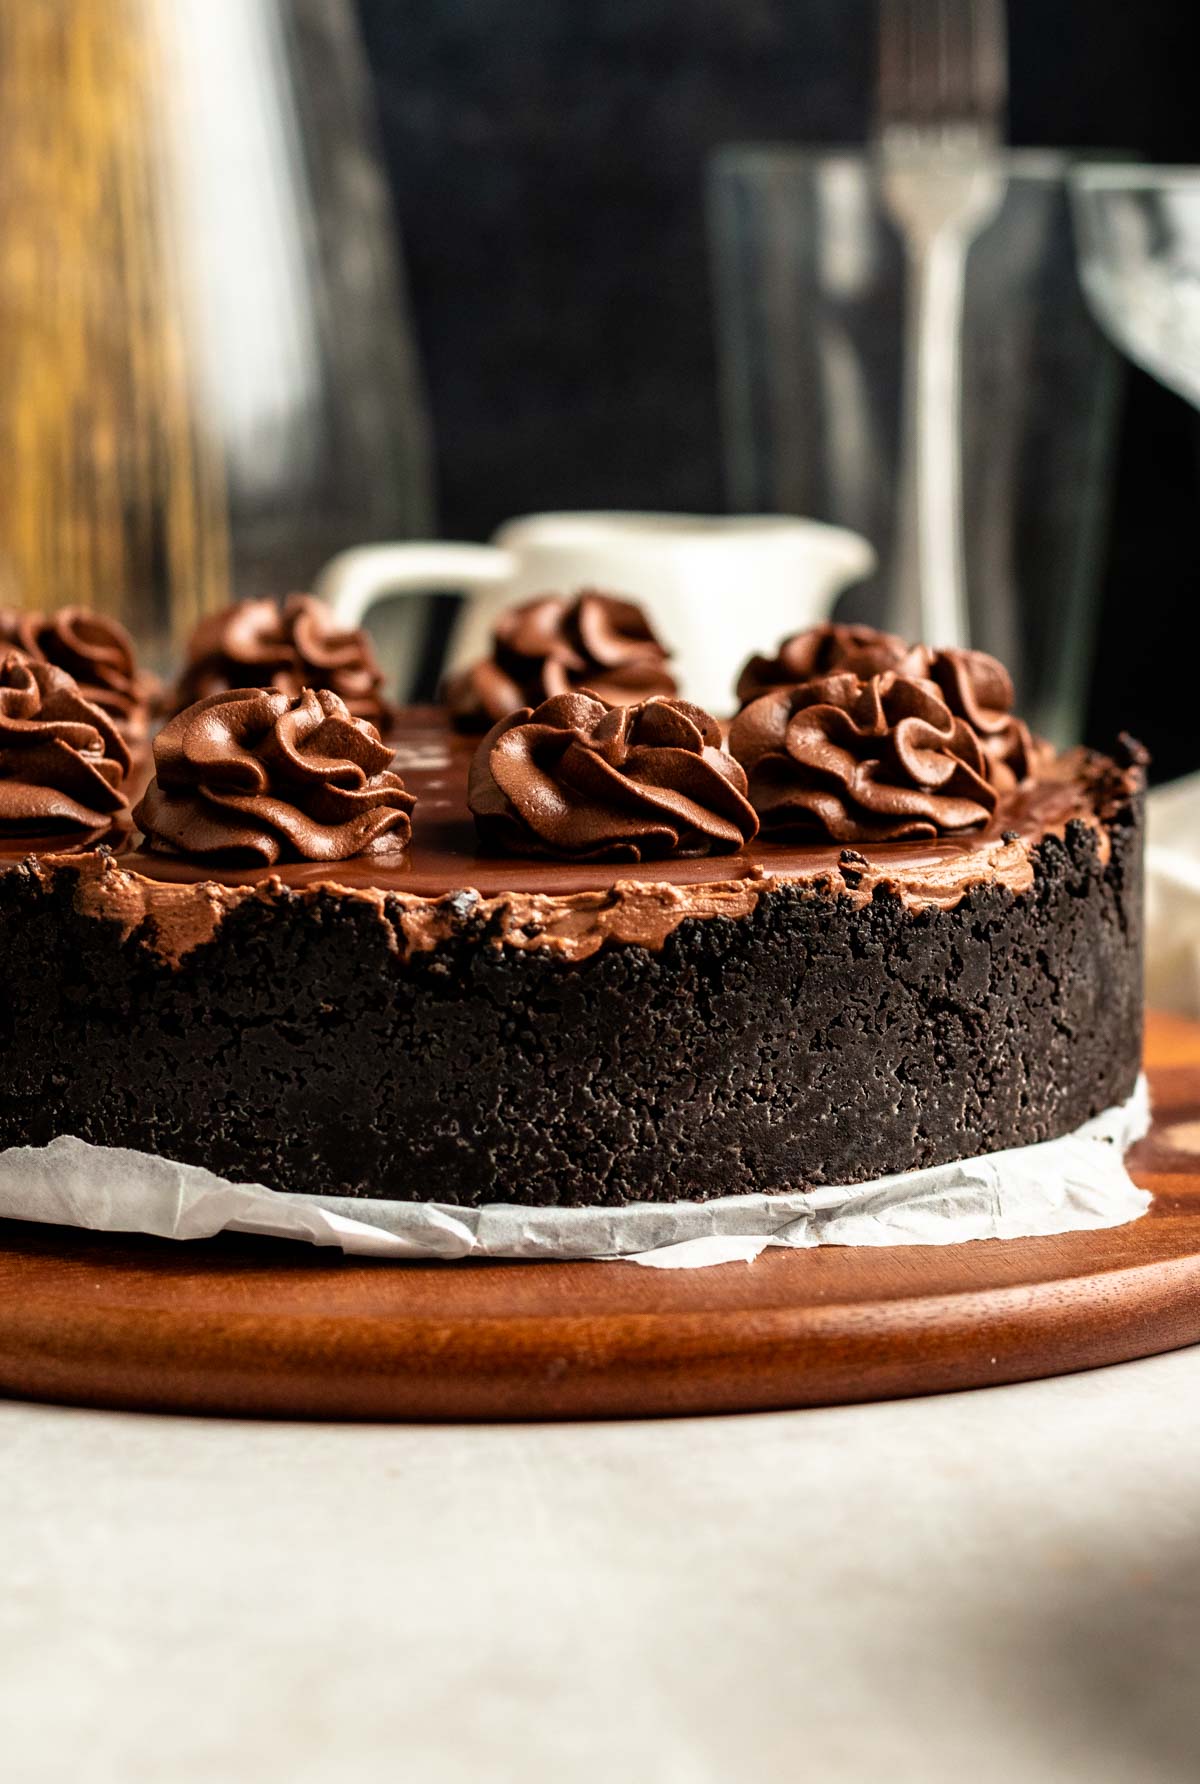
Unlike standard recipes that rely on pudding mix, this version sets without gelatin, ensuring a stable, professional-tier slice that holds its shape.
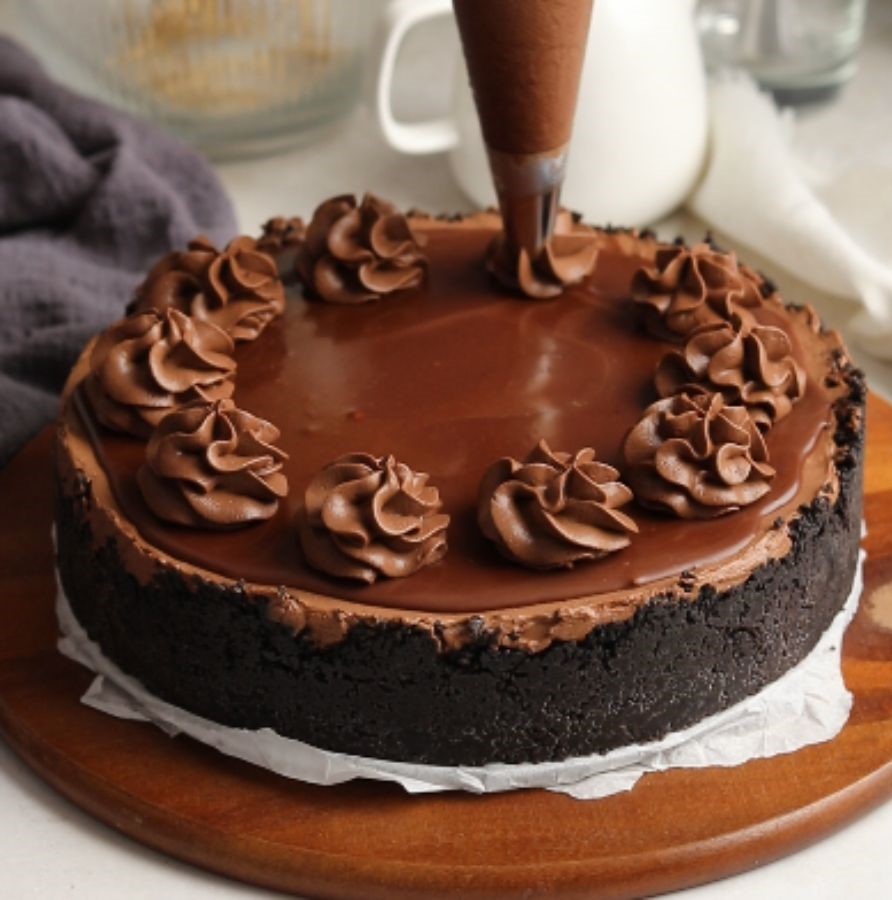
Finished with a glossy chocolate ganache and stabilized chocolate whipped cream, it’s a foolproof, make-ahead dessert designed for maximum indulgence with zero oven time.
For more delicious cheesecake recipes, check out my cherry cheesecake, baklava cheesecake, creamy vanilla cheesecake, pistachio cheesecake, and cinnamon roll cheesecake.
Jump to:
Why this recipe works
- Natural Stability: Unlike many no-bake desserts that rely on gelatin or instant pudding powder, this cheesecake is naturally stabilized using a combination of cocoa powder and melted chocolate.
- Rich Double-Chocolate Flavor: By using both cocoa powder and a melted chocolate ganache base, the filling achieves a deep, truffle-like intensity that cocoa powder alone cannot provide.
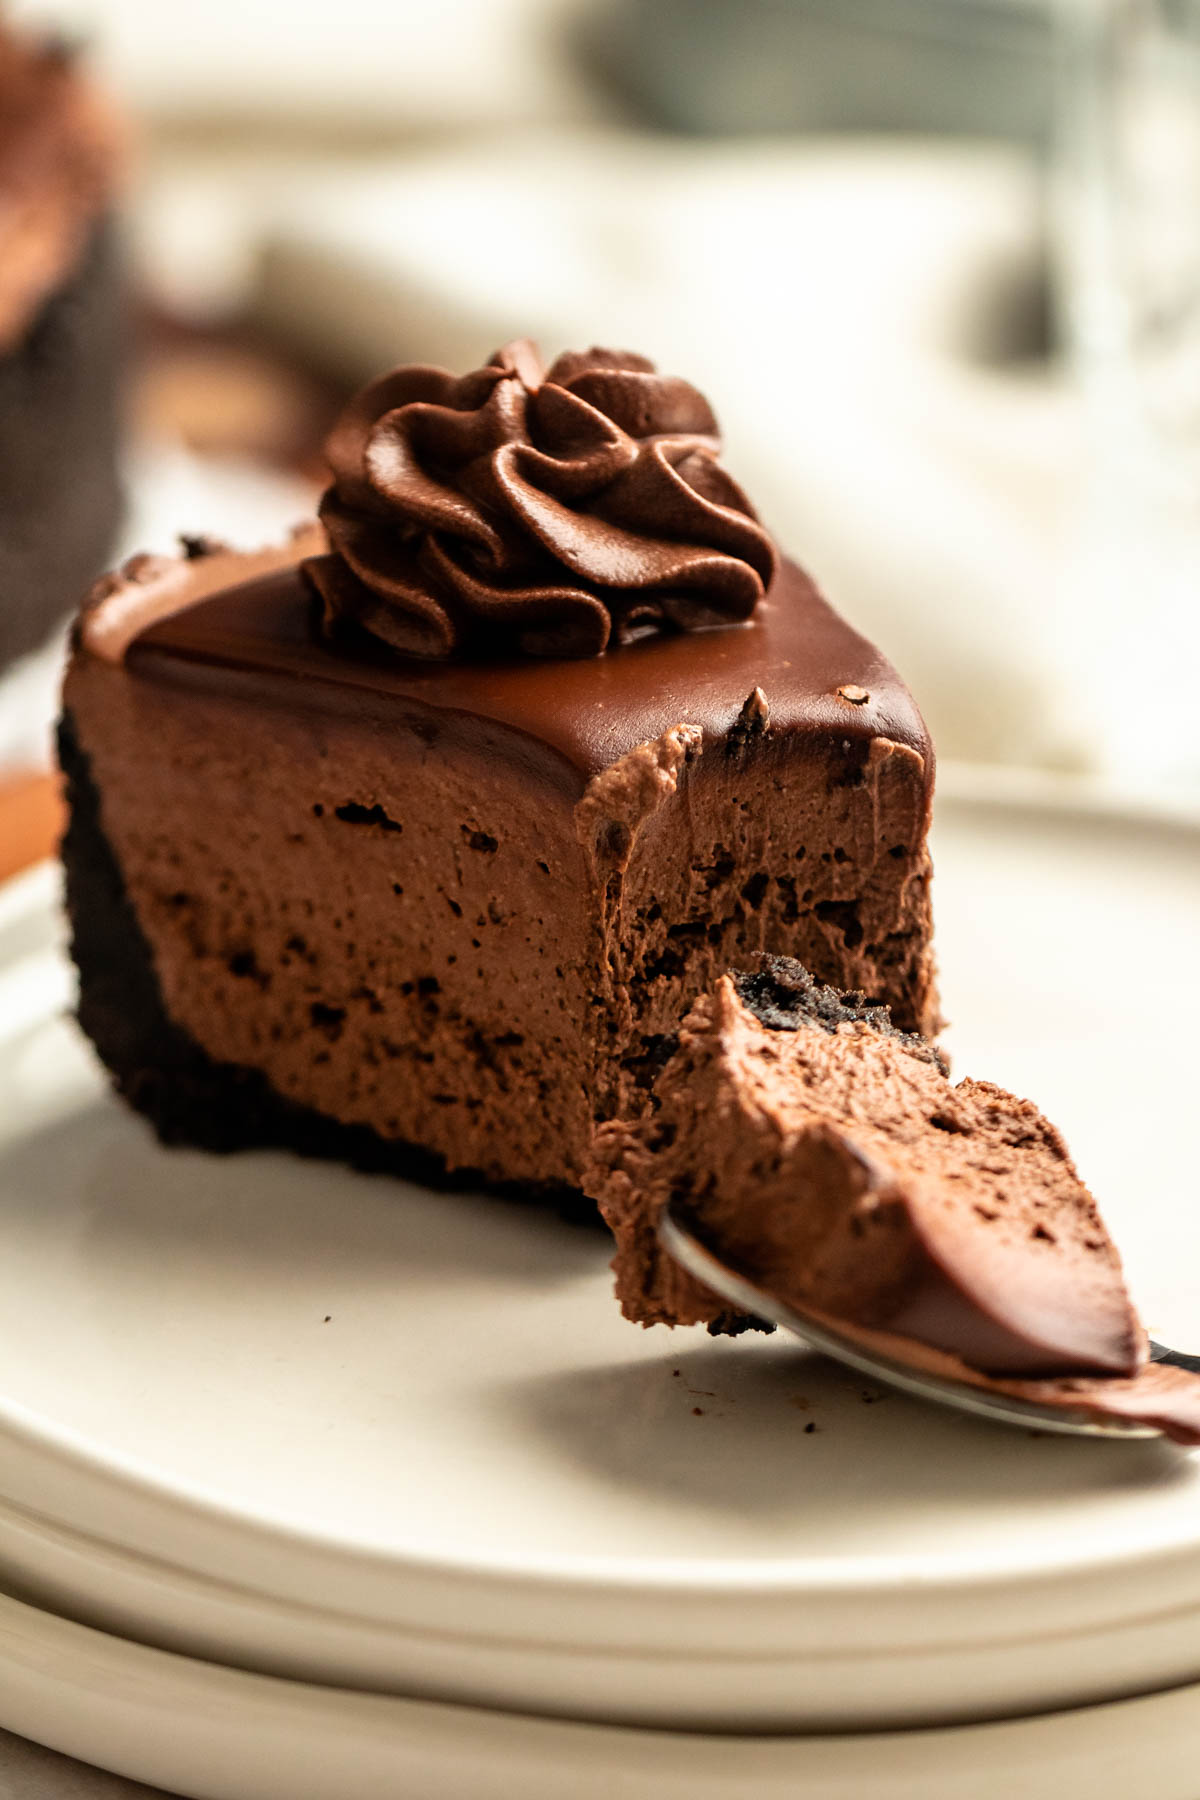
- Velvety Texture: The ratio of cream cheese to heavy cream creates a mousse-like consistency that is incredibly light yet indulgent, avoiding the "heavy" or "rubbery" texture of gelatin-based cakes.
- Make-Ahead Convenience: This is a true 20-minute prep dessert. Because it is engineered for stability, it can be made up to two days in advance, making it the ultimate stress-free option for hosting.
- Perfect Snap: The Oreo crust is designed with just enough butter to stay crisp, providing a necessary textural contrast to the silky chocolate filling.

Ingredients
Before you start to make this recipe, measure and prepare your ingredients so the cooking process will go smoothly and easily.
Full measurements are in the recipe card below.
Oreo Crust
- Oreo Cookies: Use original Oreo cookies; avoid Double Stuf to ensure the crust sets firmly without excess oil.
- Unsalted Butter: Melted to act as the primary binder for a crisp, stable base.
Chocolate Filling
- Full-Fat Cream Cheese: Use block-style only. It must be at room temperature to prevent lumps when combined with melted chocolate.
- Powdered Sugar: Sifted to ensure a silky texture. The cornstarch content helps the filling hold its shape once set.
- Unsweetened Cocoa Powder: Use Dutch-processed for deep color and a smooth, less acidic chocolate profile.
- Dark Chocolate (60-70% Cacao): Use a high-quality bar rather than chips. This is the structural stabilizer that replaces gelatin.
- Heavy Whipping Cream: Must be fridge-cold and at least 36% fat to achieve the necessary aeration and stability.
- Vanilla Extract: Enhances the complexity of the chocolate flavors.
Chocolate Ganache
- Semi-Sweet Chocolate: Finely chopped for even melting into a glossy, professional finish.
- Heavy Cream: Heated to create a silk-like emulsion that remains soft enough to slice.
Chocolate Whipped Cream
- Heavy Whipping Cream: Kept cold until use to ensure high-volume, stable peaks.
- Cocoa Powder: Sifted to ensure a smooth, grit-free finish for piping.
Instructions
Prepare the Oreo Base
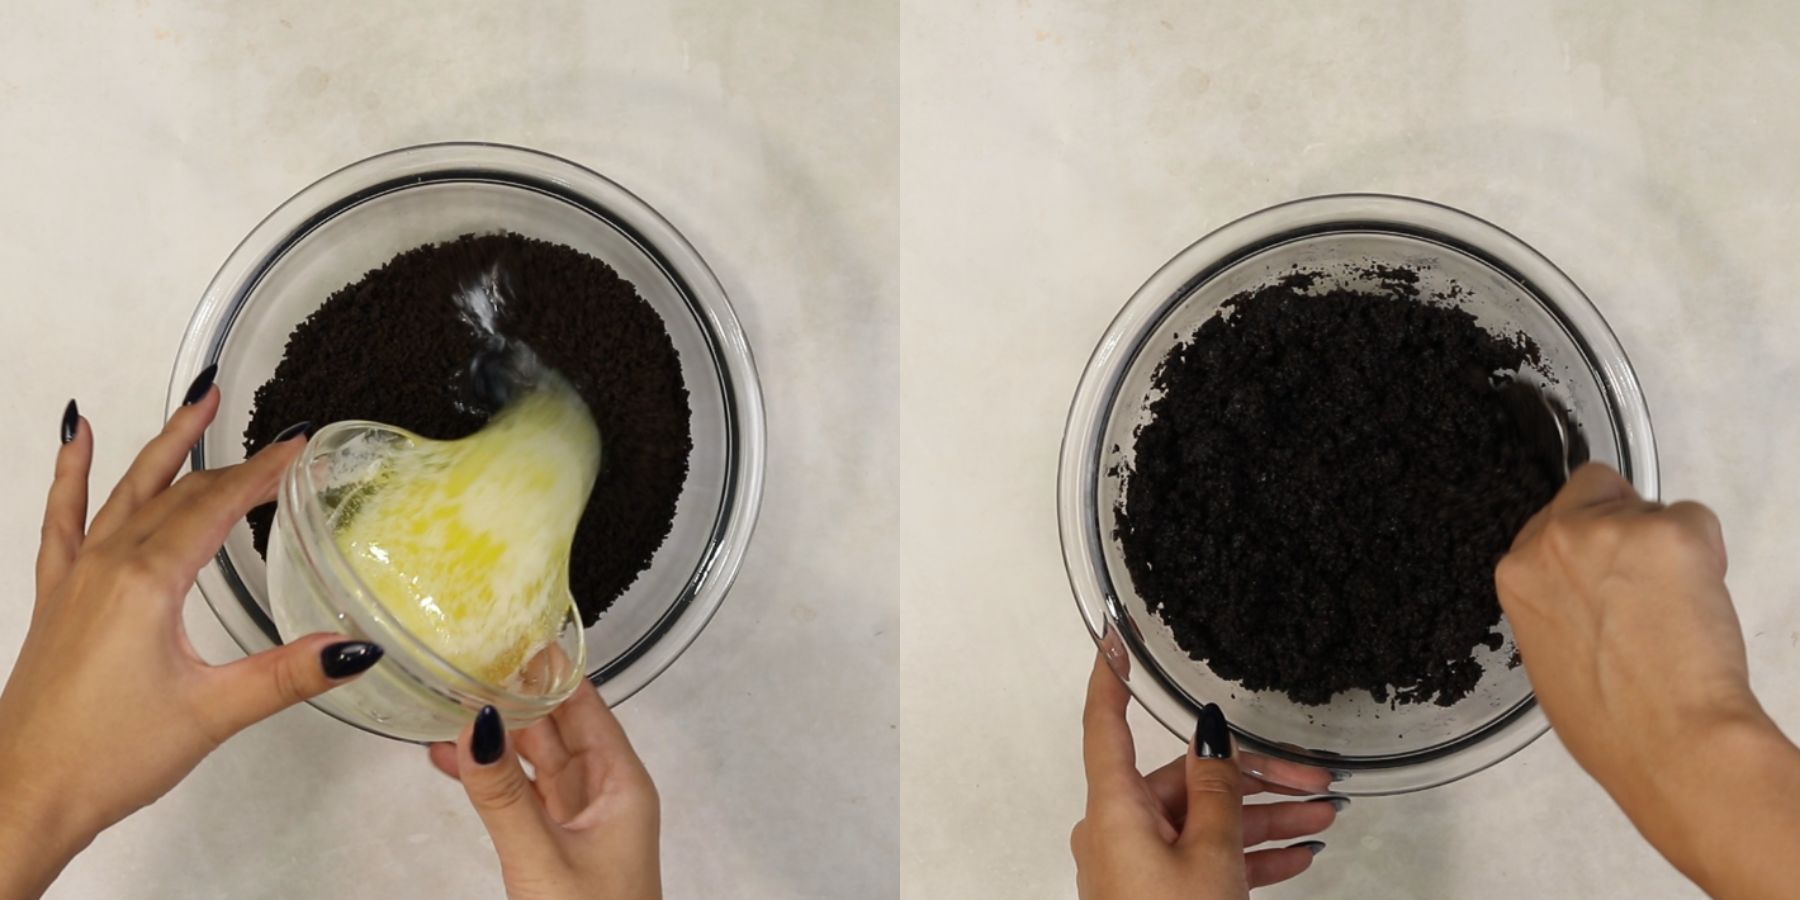
Pulse the Oreo cookies in a food processor until you reach a fine, sandy crumb.
Mix the crumbs with melted butter until the texture resembles wet sand.
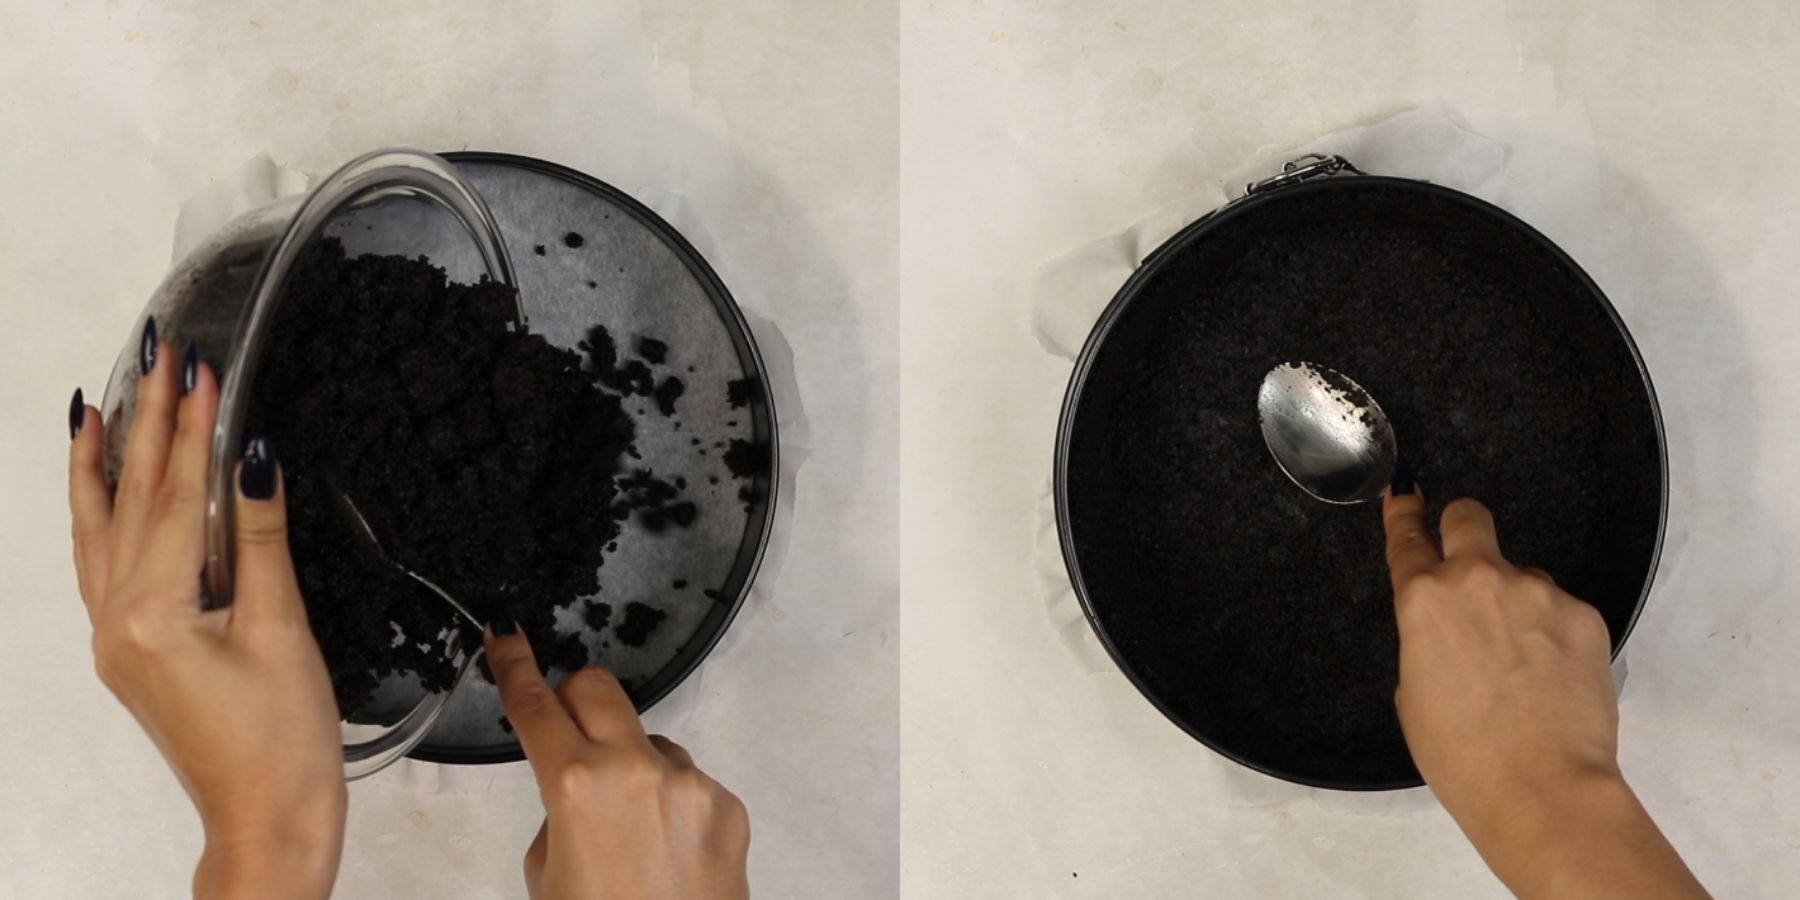
Firmly pack the mixture into the bottom of a 9-inch springform pan. Use the bottom of a flat measuring cup to ensure the crust is even and tightly packed.
Place the pan in the freezer while you prepare the filling to help the base set.
Melt the Chocolate Cheesecake Filling
Combine the chopped dark chocolate and a small portion of the heavy cream. Microwave in 20-second bursts, stirring until glossy and smooth.
Let the mixture sit for a few minutes. It should be fluid but not hot to the touch before adding it to the cream cheese.
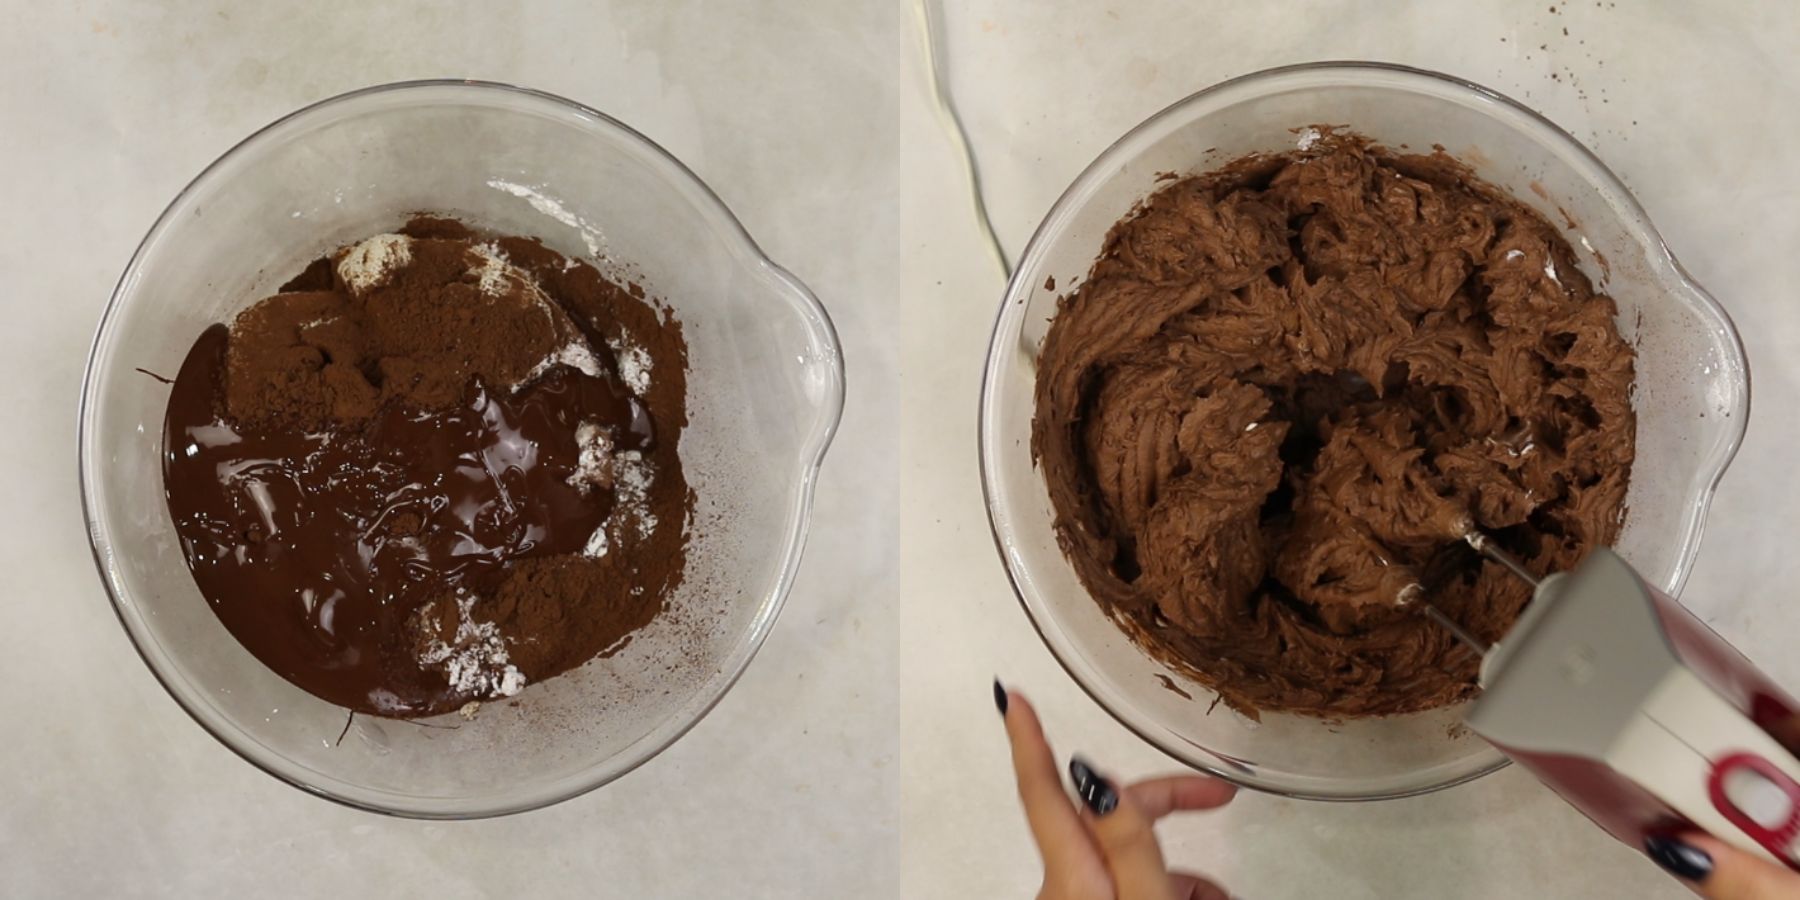
In a large bowl, beat the room-temperature cream cheese, powdered sugar, and sifted cocoa powder until completely smooth and free of lumps.
Pour in the melted chocolate and vanilla. Mix on medium speed until the color is uniform and the texture is thick and glossy.
With the mixer on medium-low, slowly pour in the remaining cold heavy cream in a steady stream.
Once all the cream is added, increase the speed to medium-high. Beat until the mixture transforms into a thick, stiff, and mousse-like consistency. The cocoa powder and melted chocolate will stabilize the cream as it whips.

Spread the filling over the chilled crust using an offset spatula for a level finish.
Refrigerate for at least 8 hours (overnight is best). This allows the cocoa butter to fully firm up, creating a sliceable texture without gelatin.

Make the chocolate ganache: Place finely chopped chocolate and heavy cream in a small, microwave-safe bowl. Microwave in 20-second intervals, stirring gently between each, until the chocolate is 80% melted.
Let it sit for 1 minute, then stir slowly from the center outward until glossy and smooth.
Use an offset spatula or the back of a spoon to gently spread the ganache to the edges, allowing it to level out into a perfectly smooth, mirror-like finish.

Make the chocolate whipped cream: whip heavy cream, powdered sugar, and cocoa to stiff peaks. Use a star piping tip to pipe dollops around the edges.
Expert Tips
- Temperature Control: Ensure your cream cheese is truly at room temperature. If it's even slightly cold, it will seize when it hits the melted chocolate, creating a grainy texture rather than a silky-smooth emulsion.
- Sifting: Always sift your cocoa powder and powdered sugar. Because this is a no-bake recipe, there is no heat to break down lumps; sifting is the only way to ensure a professional, grit-free mouthfeel.
- Bloom the Cocoa: For a deeper chocolate profile, mix the cocoa powder into the warm melted chocolate before adding it to the cream cheese. This "blooms" the cocoa, releasing more intense flavor compounds.
- Avoid Over-Whipping: Once you add the heavy cream and the mixture reaches stiff peaks, stop immediately. Over-beating at this stage can cause the fats to separate, leading to a curdled appearance.
- The Clean Slice: For professional-looking slices, dip a sharp knife in hot water and wipe it dry between every single cut. The heat from the blade will glide through the chilled cocoa butter for a perfect edge.
- Stability Hack: If you are serving this at an outdoor event, ensure you use heavy cream with at least 36-40% fat content. The higher fat percentage, combined with the melted chocolate, creates a structural bond that resists melting better than standard 30% creams.
Troubleshooting
Lumpy Filling:
- Cause: The cream cheese was too cold or the melted chocolate was added while too hot, causing the mixture to seize.
- Fix: Always ensure cream cheese is soft to the touch and chocolate is fluid but barely warm. If lumps occur, gently use a handheld mixer on a higher speed for 30 seconds to emulsify.
Filling is Runny or Soft:
- Cause: Under-whipped heavy cream or using "spreadable" cream cheese from a tub.
- Fix: Ensure you are using block-style cream cheese. If the mixture is soft, chill it for a full 24 hours. The cocoa butter and chocolate need time to fully crystallize to create a firm structure.
Crust Crumbles When Slicing:
- Cause: Crumbs were too large or not pressed firmly enough.
- Fix: Ensure the Oreos are processed into a fine, sand-like powder. Use the flat bottom of a heavy glass to compress the base into the pan with significant pressure before chilling.
Ganache is Dull or Grainy:
- Cause: The cream was overheated or stirred too vigorously, incorporating air.
- Fix: Heat cream only until it begins to simmer (don't boil). Let it sit over the chocolate for a full minute before stirring slowly in small circles from the center to create a smooth emulsion.
Whipped Cream Dollops Are Deflating:
- Cause: The cream wasn't whipped to stiff peaks or was too warm.
- Fix: Always chill your bowl and whisk before whipping. The addition of powdered sugar (which contains cornstarch) is essential here as it acts as a stabilizer to keep the dollops firm for days.
Faq's
No. Chocolate chips contain soy lecithin and stabilizers that resist smooth melting. Use a high-quality chocolate bar; its higher cocoa butter content is the primary structural agent that sets the cake without gelatin.
Tub-style cream cheese is aerated and contains higher moisture levels. Only block-style has the density and fat ratio required to emulsify with melted chocolate and maintain a sliceable structure.
Up to 2 hours in a cool environment. The melted chocolate creates a more stable "cocoa butter matrix" than standard no-bake recipes, but it will lose its crisp, professional edge if it exceeds 22°C (72°F).
Storing
Store in an airtight container or tightly wrapped in the springform pan for up to 5 days. The flavor deepens, and the texture becomes even fudgier by day two.
Freezing and Thawing
To freeze the cheesecake, flash-freeze the set cake for 1 hour to harden the ganache, then double-wrap it tightly in plastic wrap and aluminum foil to block freezer odors and prevent moisture loss for up to 3 months.
Always thaw the cake in the refrigerator for 24 hours rather than at room temperature to prevent condensation from dulling the glossy finish.
For the best professional results, pipe the fresh chocolate whipped cream dollops only after the cake is fully thawed to maintain their stability and aeration.
Substitutions
Gluten-Free Crust: Use Gluten-Free Oreos or any gluten-free chocolate sandwich cookie. The filling and ganache are naturally gluten-free, so this change makes the entire dessert safe for gluten-free diets.
Dairy Substitutes:
- Cream Cheese: Substitute with Mascarpone for a richer, less tangy flavor. It has the same density and fat content required for a firm set.
- Heavy Cream: Use a high-fat coconut cream (chilled overnight) if looking for a non-dairy alternative, though the flavor profile will shift.
Chocolate Varieties: Replace the dark chocolate bar with semi-sweet or bittersweet chocolate. Avoid milk chocolate or white chocolate in the filling, as they have fewer cocoa solids and will result in a runny, unstable cheesecake.
Alternative Cookies: Substitute Oreos with Chocolate Graham Crackers or Chocolate Digestive Biscuits. If using these, increase the melted butter by 1–2 tablespoons, as they are drier than cream-filled sandwich cookies.
Variations
Nutella: Replace 100g of melted chocolate with Nutella. This adds hazelnut lipids for a softer, truffle-like consistency.
Raspberry: Swirl ¼ cup of thick raspberry compote into the filling before chilling. Use a reduced, high-viscosity compote to ensure the moisture doesn't compromise the cheesecake's set.
Mocha: Dissolve 2 tablespoon instant espresso powder into the heavy cream. This chemically intensifies the chocolate’s flavor profile without altering the liquid ratio.
Peanut Butter: Mix ½ cup creamy peanut butter into the cream cheese base. The high oil content maintains structural integrity while adding saltiness.
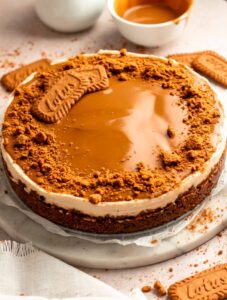
Salted Caramel: Layer ¼ cup thick caramel over the crust before adding the filling. Use a high-viscosity caramel to prevent the layers from bleeding.
Equipment
- 9-inch Springform Pan: Essential for removing the cheesecake without damaging the sides.
- Electric Hand Mixer or Stand Mixer: Required to aerate the cream cheese and whip the heavy cream to stiff peaks for a light, stable texture.
- Large Glass Mixing Bowls: Ideal for melting chocolate in the microwave or over a double boiler without scorching.
- Food Processor: Used to pulse the chocolate sandwich cookies into a fine, uniform crumb for a compact crust.
- Rubber Spatula: Necessary for folding the whipped cream into the chocolate mixture without deflating the air bubbles.
- Offset Spatula: Used to achieve a perfectly flat, professional finish on the cheesecake surface and smooth the ganache.
- Piping Bag & Star Tip: (Optional) For adding decorative chocolate whipped cream dollops after the cake has set.
More Chocolate Desserts
- Chocolate Mayonnaise Cake: A decadent, incredibly moist, and tender cake topped with a rich chocolate fudge frosting.
- Dark Chocolate Brownies: Fudgy and moist brownies made with Dutch-processed cocoa powder and high-quality dark chocolate for an intense flavor.
- Chocolate Tres Leches Cake: A cocoa sponge soaked in a three-milk chocolate mixture and topped with stabilized chocolate whipped cream.
Connect With Us
Review: Leave a rating and comment below if you enjoyed this recipe. Socials: Follow on Facebook, Instagram, and Pinterest. Save: Pin this recipe to Pinterest for later.
📖 Recipe
Creamy No Bake Chocolate Cheesecake
Ingredients
For the crust
- 34 Oreos classic Oreos
- 3.5 oz Butter melted
For the cheesecake filling
- 24 oz Cream cheese room temp, full fat
- 2 teaspoon Vanilla extract
- 1 cup Powdered sugar
- ½ cup Cocoa powder Dutch-processed
- 10.5 oz Dark chocolate
- 1 cup Heavy cream cold
For the chocolate ganache
- 3.5 oz Heavy cream
- 3.5 oz Dark chocolate
For the chocolate whipped cream
- 1 cup Heavy cream cold
- 3 tablespoon Cocoa powder
- 1 teaspoon Vanilla extract
- 3 tablespoon Powdered sugar
Instructions
Prepare the Oreo Base
- Pulse the Oreo cookies in a food processor until you reach a fine, sandy crumb.
- Mix the crumbs with melted butter until the texture resembles wet sand.
- Firmly pack the mixture into the bottom of a 9-inch springform pan. Use the bottom of a flat measuring cup to ensure the crust is even and tightly packed.
- Place the pan in the freezer while you prepare the filling to help the base set.
Melt the Chocolate Cheesecake Filling
- Combine the chopped dark chocolate and a small portion of the heavy cream. Microwave in 20-second bursts, stirring until glossy and smooth.
- Let the mixture sit for a few minutes. It should be fluid but not hot to the touch before adding it to the cream cheese.
- In a large bowl, beat the room-temperature cream cheese, powdered sugar, and sifted cocoa powder until completely smooth and free of lumps.
- Pour in the melted chocolate and vanilla. Mix on medium speed until the color is uniform and the texture is thick and glossy.
- With the mixer on medium-low, slowly pour in the remaining cold heavy cream in a steady stream.
- Once all the cream is added, increase the speed to medium-high. Beat until the mixture transforms into a thick, stiff, and mousse-like consistency. The cocoa powder and melted chocolate will stabilize the cream as it whips.
- Spread the filling over the chilled crust using an offset spatula for a level finish.
- Refrigerate for at least 8 hours (overnight is best). This allows the cocoa butter to fully firm up, creating a sliceable texture without gelatin.
Make the chocolate ganache
- Place finely chopped chocolate and heavy cream in a small, microwave-safe bowl. Microwave in 20-second intervals, stirring gently between each, until the chocolate is 80% melted.
- Let it sit for 1 minute, then stir slowly from the center outward until glossy and smooth.
- Use an offset spatula or the back of a spoon to gently spread the ganache to the edges, allowing it to level out into a perfectly smooth, mirror-like finish.
Make the chocolate whipped cream
- Whip heavy cream, powdered sugar, and cocoa to stiff peaks. Use a star piping tip to pipe dollops around the edges.
Notes
- Temperature Control: Ensure your cream cheese is truly at room temperature. If it's even slightly cold, it will seize when it hits the melted chocolate, creating a grainy texture rather than a silky-smooth emulsion.
- Sifting: Always sift your cocoa powder and powdered sugar. Because this is a no-bake recipe, there is no heat to break down lumps; sifting is the only way to ensure a professional, grit-free mouthfeel.
- Bloom the Cocoa: For a deeper chocolate profile, mix the cocoa powder into the warm melted chocolate before adding it to the cream cheese. This "blooms" the cocoa, releasing more intense flavor compounds.
- Avoid Over-Whipping: Once you add the heavy cream and the mixture reaches stiff peaks, stop immediately. Over-beating at this stage can cause the fats to separate, leading to a curdled appearance.
- The Clean Slice: For professional-looking slices, dip a sharp knife in hot water and wipe it dry between every single cut. The heat from the blade will glide through the chilled cocoa butter for a perfect edge.
- Stability Hack: If you are serving this at an outdoor event, ensure you use heavy cream with at least 36-40% fat content. The higher fat percentage, combined with the melted chocolate, creates a structural bond that resists melting better than standard 30% creams.

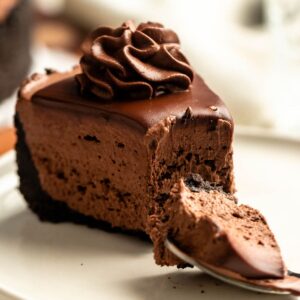
Aliaa says
So incredibly creamy.