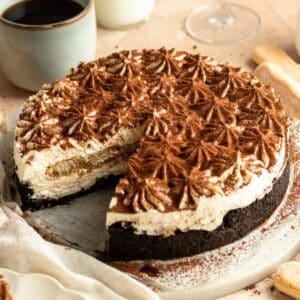
This tiramisu cheesecake features an Oreo crust, no-bake mascarpone filling, coffee-soaked ladyfingers, and a dusting of cocoa powder.

This no-bake tiramisu cheesecake is creamy, rich, and surprisingly easy to make. It starts with a chocolatey Oreo crust, then gets filled with a smooth no-bake mascarpone mixture that tastes light and velvety.
Soft ladyfingers soaked in coffee in the middle of the mascarpone filling add that classic tiramisu flavor and a delicious layered texture.
A dusting of cocoa powder on top ties everything together. It’s a simple yet impressive dessert that looks beautiful and works for any occasion, from family dinners to special celebrations.
Since it's a no-bake recipe, you don’t need an oven; just mix, layer, chill, and enjoy. It’s a simple yet impressive dessert that works for any occasion.
For more tiramisu recipes, check out my lemon tiramisu, tiramisu cake, strawberry tiramisu, tiramisu cups, and eggless tiramisu.
Jump to:
Why this recipe works
- Texture– The cheesecake has a smooth, creamy filling that feels light and silky, balanced by a firm, chocolatey Oreo crust and soft ladyfinger layers.
- Tiramisu flavor– The mascarpone, espresso, and cocoa come together to create that classic tiramisu taste in every bite.
- No-bake– Since this is a no-bake recipe, you don’t need an oven—just mix, layer, and chill, making it perfect for warm days or busy schedules.
- Ease– The steps are simple, the ingredients are easy to find, and the cheesecake sets beautifully without much effort.
- Espresso-soaked ladyfingers– The soft, coffee-soaked ladyfingers add rich espresso flavor and a delicious tiramisu-style texture that makes the dessert extra unique.

Ingredients
Before you start to make this recipe, measure and prepare your ingredients so the cooking process will go smoothly and easily.
Full measurements are in the recipe card below.
For the crust
Oreos– you’ll need 30 Oreo cookies crushed into fine crumbs. They create a rich, chocolatey base for the cheesecake.
Butter– melted unsalted butter binds the crust together and adds flavor.
Espresso powder– adds a hint of coffee flavor that pairs perfectly with the tiramisu layers.
For the cheesecake filling
Cream cheese– use full-fat cream cheese at room temperature for a smooth, creamy filling.
Mascarpone cheese– gives the cheesecake its classic tiramisu flavor and a light, silky texture.
Heavy cream– cold heavy cream helps the cheesecake set and makes it fluffy and stable.
Powdered sugar– sweetens the filling and blends smoothly without graininess.
Instant vanilla pudding mix– helps thicken the filling and gives it a stable, mousse-like texture without using gelatin.
Sour cream– adds creaminess and a slight tang that balances the sweetness.
Vanilla extract- vanilla extract adds extra flavor. For extra vanilla flavor, use vanilla bean extract or an actual vanilla bean!
Assembly
Ladyfingers– you’ll need about 10 ladyfingers to layer inside the cheesecake for classic tiramisu texture.
Cocoa powder– for dusting the top. Use unsweetened cocoa powder.
Espresso– strong espresso or coffee for soaking the ladyfingers.
Kahlúa (optional)– adds a light coffee-liqueur flavor to the espresso for an extra tiramisu touch.
Instructions
Line a 9-inch springform pan with parchment paper and set aside.
Pulse the Oreos in a food processor until fine crumbs form. If you don’t have a food processor, place the Oreos in a zip-top bag and crush them with a rolling pin or cup until very fine.
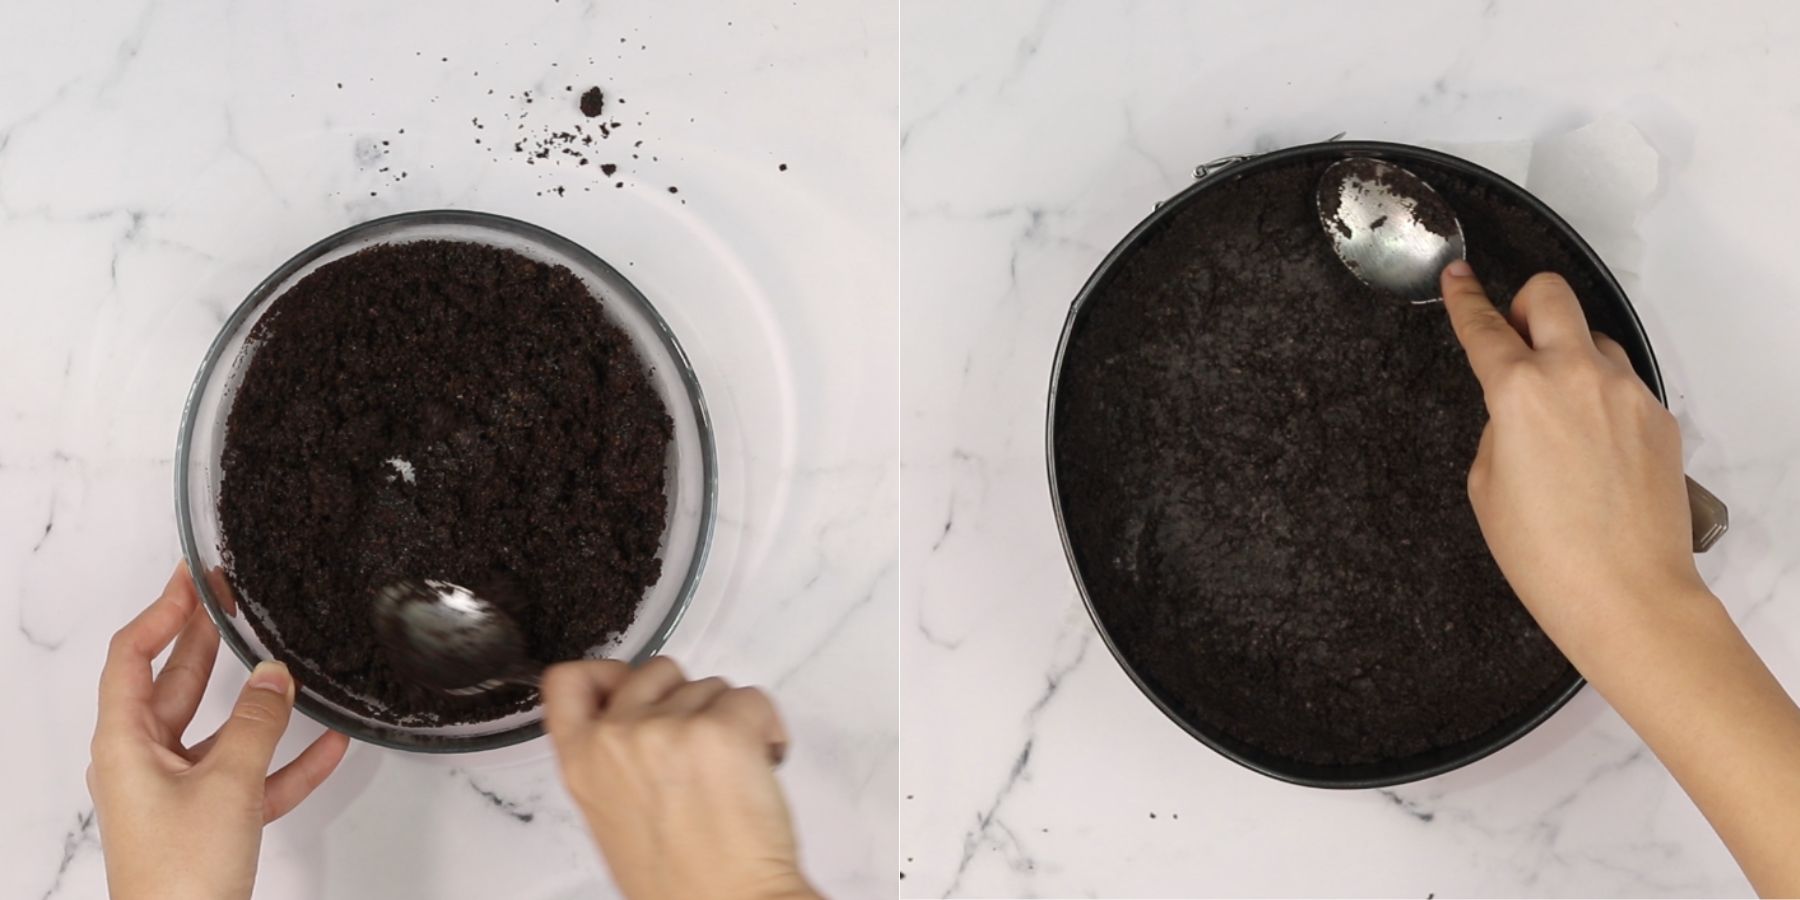
In a mixing bowl, combine the Oreo crumbs, espresso powder, and melted butter. Mix until all the crumbs are coated.
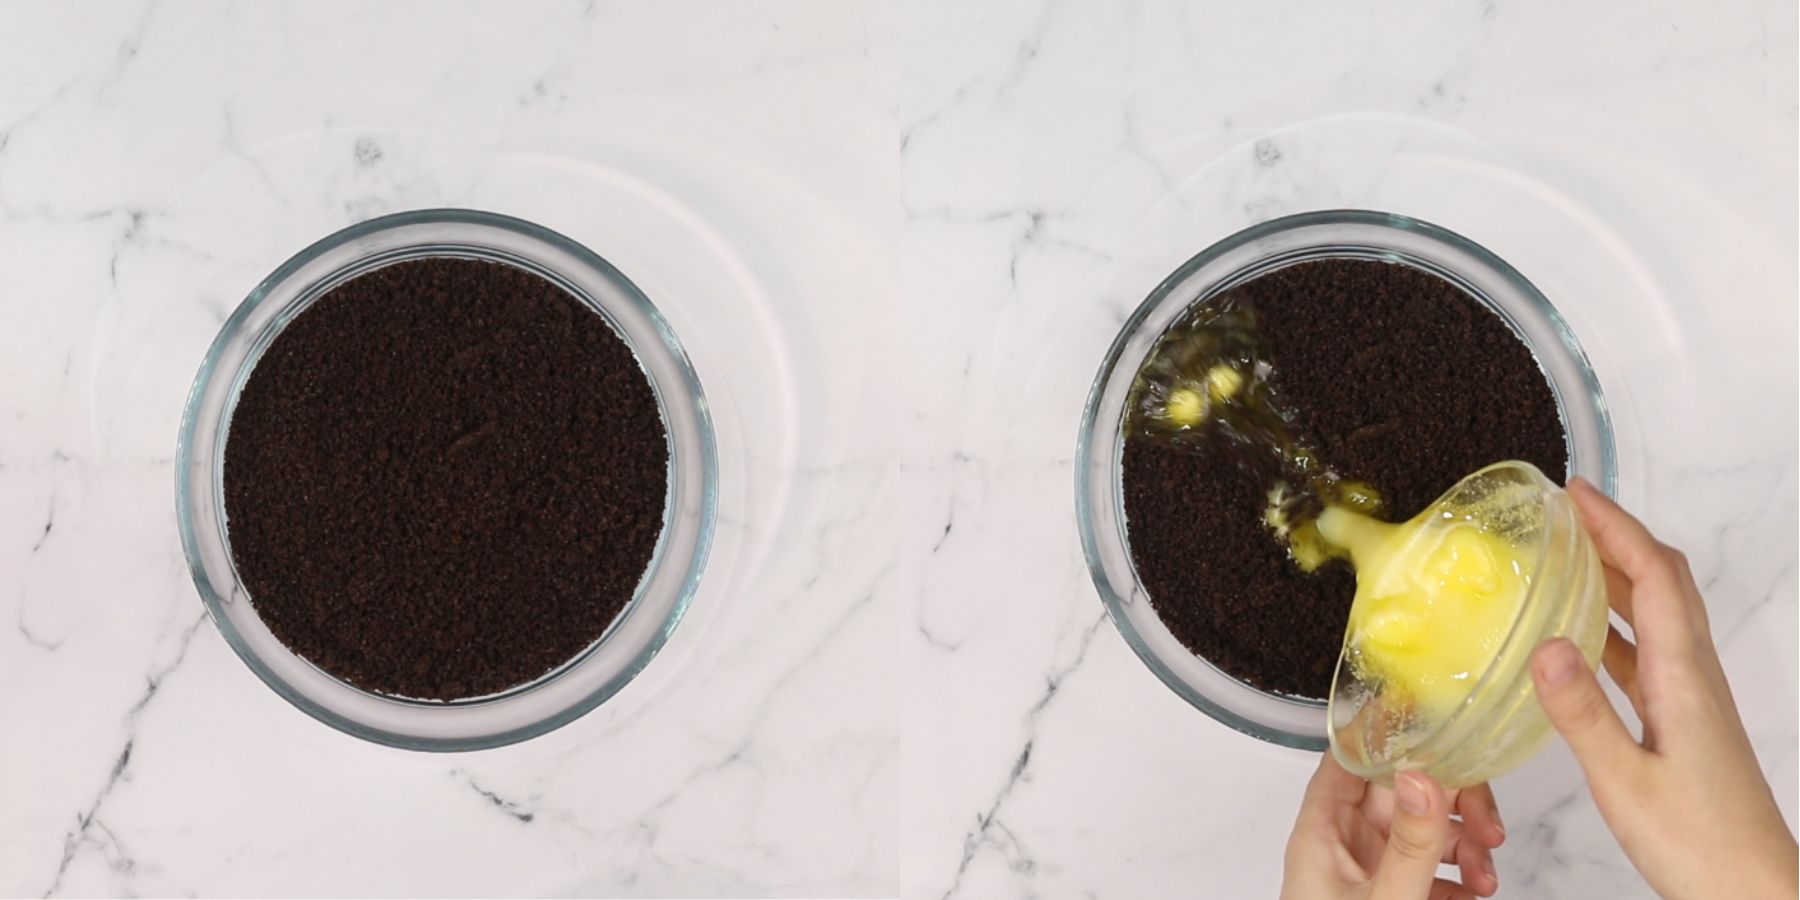
Press the mixture firmly and evenly into the bottom of the prepared pan. Transfer the pan to the freezer to firm up while you make the filling.
In a large mixing bowl, add the softened cream cheese, mascarpone, sour cream, cold heavy cream, powdered sugar, vanilla extract, and instant vanilla pudding mix.
Whip with an electric hand mixer until smooth, creamy, and fully combined.

Remove the crust from the freezer and spread ⅓ of the cheesecake filling over the crust in an even layer.
Quickly dip each ladyfinger into the espresso (add Kahlúa if using), dipping for less than a second so they don’t get too soft. Arrange the dipped ladyfingers in an even layer over the filling.

Spread a thin layer of cheesecake filling over the ladyfingers to cover them.
Transfer the remaining cheesecake filling to a piping bag fitted with a star tip and pipe dollops all over the top of the cheesecake.
Cover the pan with plastic wrap and refrigerate for at least 4 hours, or until fully set and the ladyfingers have softened.

Remove from the fridge, release the cheesecake from the springform pan, and transfer to a serving plate.

Dust generously with cocoa powder, slice, and enjoy!

Expert Tips
- Use room-temperature cream cheese and mascarpone. Soft cream cheese blends smoothly and prevents lumps. Cold cheese will create a grainy mixture that won’t turn creamy.
- Use COLD heavy cream. Cold cream whips faster, holds its shape better, and gives the cheesecake a stable, fluffy texture. Room-temperature cream won’t whip as well.
- Chill the mixing bowl. To help the cream whip even faster, place your mixing bowl in the freezer for about 10 minutes before whipping.
- Use a nonstick springform pan. This makes it easy to release the cheesecake cleanly without damaging the edges.
- Don’t overmix the filling. Over-whipping can cause the mixture to curdle or become too soft to set properly. Mix just until smooth and creamy.
- Use full-fat cream cheese. High-fat cream cheese (like Philadelphia) gives the cheesecake structure and the best flavor. Low-fat versions won’t set as well.
- Let the cheesecake set fully. Chill the cheesecake for at least 5 hours, preferably overnight. This helps it firm up and gives the flavors time to develop.
- Scrape the bowl often. Frequently scraping down the sides ensures the mixture stays smooth and lump-free.
- Dip ladyfingers quickly. A super quick dip (less than 1 second) keeps them soft but not soggy, so the layers hold their shape.
- Dust the cocoa right before serving. This keeps the cocoa powder fresh, dry, and beautiful on top of the cheesecake.

Faq's
Tiramisu cheesecake is made with an Oreo crust, filled with mascarpone and cream cheese filling, filled with a middle of soaked ladyfingers, and topped with plenty of cocoa powder on top.
If you do not want to use alcohol in tiramisu, swap the alcohol with more espresso.
You can find mascarpone cheese in the deli section of your grocery store, where all the cheeses, hummus, and meat products.
Yes! You can make this tiramisu with homemade ladyfingers instead of store-bought for a delicious dessert.
Storing
Store the cheesecake in the fridge, covered tightly with plastic wrap or in an airtight container, for up to 4 days. Keep it chilled until serving, since the mascarpone and whipped filling need to stay cold to hold their shape.
Before serving, dust with a fresh layer of cocoa powder if needed.
Freezing
Freeze the cheesecake before adding the cocoa powder. First, chill it in the fridge until firm, then wrap the whole cheesecake or individual slices tightly in plastic wrap, followed by a layer of foil.
Place it in a freezer-safe container and freeze for up to 2 months.
To serve, thaw it overnight in the fridge, then dust with cocoa powder right before serving.
Make it ahead of time
Make this in advance by making it according to the instructions. Let it chill in the fridge for 1-2 days.
Top the cheesecake with the topping of your choice like cocoa powder or chocolate shavings and serve.

Substitutions
Gluten-free– Use gluten-free Oreos (or any gluten-free chocolate cookies) for the crust, and replace the ladyfingers with a gluten-free alternative, such as gluten-free ladyfingers or thin gluten-free vanilla cookies lightly dipped in espresso.
Store-bought crust– To make this recipe quicker, you can use a pre-made chocolate or graham cracker crust. Just skip making the crust and move straight to assembling the cheesecake.
Other crust options– You can switch the Oreo crust for a graham cracker crust, Biscoff cookie crust, or even a vanilla wafer crust.
Variations
Baileys- Add a few tablespoons of Baileys to the cheesecake mixture if you are a Baileys lover! Bailey's is a coffee liqueur and goes perfectly with tiramisu.
Pumpkin- incorporate 1 teaspoon of pumpkin pie spice and ½ teaspoon of cinnamon into your mascarpone filling for a seasonal twist.
Chocolate- For chocolate lovers, add ⅓ cup of cocoa powder and 100g of melted, cooled dark chocolate to the mascarpone mixture. This will give your cheesecake a rich and decadent flavor.
Nutella tiramisu cheesecake – Swirl ½ cup of warm Nutella into the filling or add a thin Nutella layer between the ladyfingers and filling for extra richness.
Lemon- add 1 teaspoon of fresh lemon zest and 3 tablespoon of lemon curd to the mascarpone filling.
Serving Tips
For serving, finish the cheesecake with a generous dusting of cocoa powder or top it with shaved chocolate for an extra-rich and elegant touch.
Equipment
- You will need a 9-inch springform pan for this cheesecake. I love this set from Amazon.
- You will also need a food processor to make the crust (if you are not using a store-bought crust).
- I also recommend using an electric hand mixer to make sure your cheesecake mixture is smooth and perfect. You can also use a stand mixer for this with a balloon attachment.
- Offset spatula for smoothing out the cheesecake in the pan.
- Rubber spatula to fold the mixture and scrape down the sides of the bowl.
- Star piping tip.
- Fine mesh strainer (for dusting cocoa powder).
- Pastry piping bag.
- Mixing bowl (set of 3).
More coffee desserts
Chewy Coffee Cookies- These delicious coffee cookies are chewy chocolate chip cookies, loaded with chocolate chunks, and espresso powder.
Chocolate Coffee Cake- This incredibly moist chocolate coffee cake is made with chocolate cake layers infused with coffee, and frosted with chocolate and coffee frosting.
Chocolate Coffee Cake- This incredibly moist chocolate coffee cake is made with chocolate cake layers infused with coffee, and frosted with chocolate and coffee frosting.
If you tried this recipe, don’t forget to leave a rating and a comment below. I love hearing from you.
If you liked this recipe
📖 Recipe
Creamy Tiramisu Cheesecake (No Bake)
Ingredients
Crust
- 30 Oreos crumbs
- 7 tablespoon Butter melted, unsalted
- ½ teaspoon Espresso powder
Cheesecake filling
- 20.1 oz Cream cheese room temp, full fat
- 10.5 oz Mascarpone cheese room temp
- 1 ¼ cup Heavy cream cold
- 1 ⅓ cup Powdered sugar
- 2 teaspoon Vanilla extract
- 2 tablespoon Instant vanilla pudding
- ⅓ cup Sour cream
Assembly
- 10 Ladyfingers
- 1-2 tablespoon Cocoa powder
- 1 cup Espresso
- 1 tablespoon Kahlua optional
Instructions
- Line a 9-inch springform pan with parchment paper and set aside.
- Pulse the Oreos in a food processor until fine crumbs form. If you don’t have a food processor, place the Oreos in a zip-top bag and crush them with a rolling pin or cup until very fine.
- In a mixing bowl, combine the Oreo crumbs, espresso powder, and melted butter. Mix until all the crumbs are coated.
- Press the mixture firmly and evenly into the bottom of the prepared pan. Transfer the pan to the freezer to firm up while you make the filling.
- In a large mixing bowl, add the softened cream cheese, mascarpone, sour cream, cold heavy cream, powdered sugar, vanilla extract, and instant vanilla pudding mix.
- Whip with an electric hand mixer until smooth, creamy, and fully combined.
- Remove the crust from the freezer and spread ⅓ of the cheesecake filling over the crust in an even layer.
- Quickly dip each ladyfinger into the espresso (add Kahlúa if using), dipping for less than a second so they don’t get too soft. Arrange the dipped ladyfingers in an even layer over the filling.
- Spread a thin layer of cheesecake filling over the ladyfingers to cover them.
- Transfer the remaining cheesecake filling to a piping bag fitted with a star tip and pipe dollops all over the top of the cheesecake.
- Cover the pan with plastic wrap and refrigerate for at least 4 hours, or until fully set and the ladyfingers have softened.
- Remove from the fridge, release the cheesecake from the springform pan, and transfer to a serving plate.
- Dust generously with cocoa powder, slice, and enjoy!
Notes
- Use room-temperature cream cheese and mascarpone. Soft cream cheese blends smoothly and prevents lumps. Cold cheese will create a grainy mixture that won’t turn creamy.
- Use COLD heavy cream. Cold cream whips faster, holds its shape better, and gives the cheesecake a stable, fluffy texture. Room-temperature cream won’t whip as well.
- Chill the mixing bowl. To help the cream whip even faster, place your mixing bowl in the freezer for about 10 minutes before whipping.
- Use a nonstick springform pan. This makes it easy to release the cheesecake cleanly without damaging the edges.
- Don’t overmix the filling. Over-whipping can cause the mixture to curdle or become too soft to set properly. Mix just until smooth and creamy.
- Use full-fat cream cheese. High-fat cream cheese (like Philadelphia) gives the cheesecake structure and the best flavor. Low-fat versions won’t set as well.
- Let the cheesecake set fully. Chill the cheesecake for at least 5 hours, preferably overnight. This helps it firm up and gives the flavors time to develop.
- Scrape the bowl often. Frequently scraping down the sides ensures the mixture stays smooth and lump-free.
- Dip ladyfingers quickly. A super quick dip (less than 1 second) keeps them soft but not soggy, so the layers hold their shape.
- Dust the cocoa right before serving. This keeps the cocoa powder fresh, dry, and beautiful on top of the cheesecake.
Habiba says
I made this cheesecake and it was the best thing ever. All the flavors balance so well and the dessert is a total winner. You have to try it .
Shamistha says
Hi we don’t hv instant vanilla pudding here can I skip it or what is the substitute I cud use pls